Blockade Labs Skybox
At the time of this writing Skybox is in Alpha
This workflow is a step-by-step guide that I use to get my AI-generated skyboxes into Twinmotion. This guide is subject to change because I am still navigating through the nuances of the programs.
The skyboxes I generate are typically done after achieving a lengthy keyword list, which usually takes hundreds of renders before I find the one or ones I want to use as a background. I pretty much exclusively use the Advanced Keyword list because it’s the one category that has a 540-character limit, and I believe the more you “train” the AI, the better the images get. Once I have a lengthy keyword list, I usually “remix” the keywords by grouping similar words together, for instance, using camera keywords, environment, lighting, textures, and so on. Also, I find that once you have that model you like, the more you remix it, the better it gets, but I don’t ever completely change the keywords when remixing. I usually change only one or two words, or I will rearrange keywords within the list. Sometimes I find that the first few words have the most emphasis on the changes to the model. Also, I find that once you are remixing a single model, the physical model and certain items in the model change, but it will not add or subtract more physical attributes within the model at this time.
For a more comprehensive look check out the YouTube video https://youtu.be/NzF-X9jpXrY
To Access the Skybox AI just click on the Logo, no signup and free for now

1. Generate your skybox you want to use, and save it to your Hard drive.
Photoshop
1. Open the file in Photoshop or similar
2. The file is already at a pretty good resolution but I like to scale all my images that will be used as HDR to 12000 x 6000, it’s just under 2X scale. I do this first using either Photoshop or Gigapixel. Then I also use Topaz Sharpen and Noise Reduction. If there is any work or tweaks to be done to the Pano I do that now.
3. Once you’re done with all that then flatten your image! YES I said the dreaded word, SO SAVE YOUR FILE if you want to access the Photoshop file again.
4. Now in the Menu go to EDIT then down to Assign Profile. You should see Assign Profile, Set the Profile to ProPhoto RGB
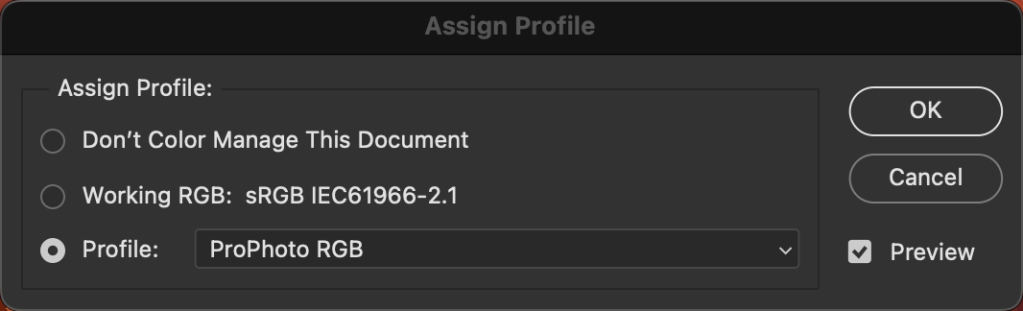
SIDE NOTE: Your image will most likely change color or look like it has a color cast, this is OKAY, this is because ProPhoto has a higher Dynamic range than JPG. Now this WILL NOT give you as high a range as shooting multiple exposures with your digital camera and stitching them into an HDR file. That’s not our goal here, we’re starting with a JPG, no choice, but this method will still produce similar results when used to light a 3D scene. It will cast shadows and you can increase or decrease the intensity.
If the color cast is too strong Then you can use an adjustment layer to fix it, I like to use Hue and Saturation and make a very slight tweak to the color and usually that is enough. Sometimes I just leave it as is. Once you are satisfied flatten the Adjustment layer. You can only have ONE layer to do this next part. Once in 32 Bit mode you would be able to do as much editing in Photoshop That’s why I do everything before this Next to Last step.
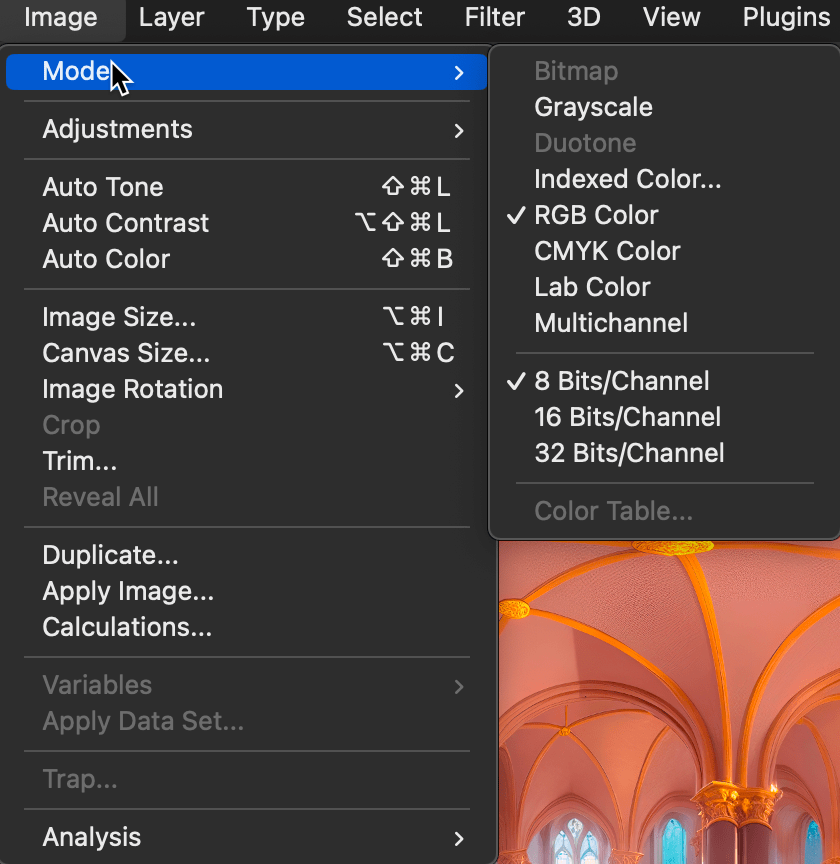
5. Now Go back to the Menu and Pick Image then Mode and change the Bit depth from 8 Bits to 32 Bits.
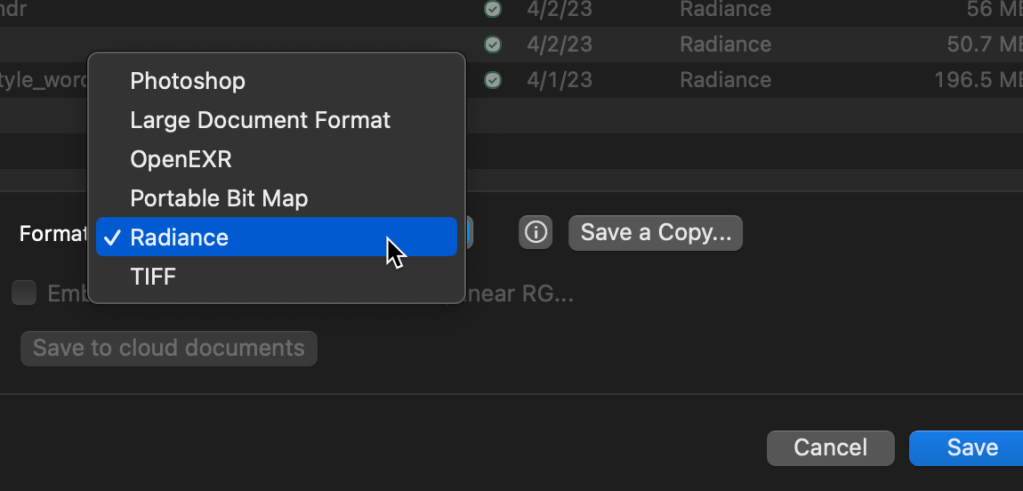
6. This is the last step in Photoshop, Go to File and do a Save As, and select Radiance from the Format List, Name your file and hit save. You should now have an HDR file. You can also use openEXR but I think Radiance is preferred.
GOING into Twinmotion
At the time of this writing we are using 2023.1
1. Open Twinmotion and close the Home Screen
This is the Opening screen you should see

2. On the right side in the Scene List, or Outliner as I like to call it, Select the Ellipsis (Three Dots) next to the Starting Landscape and delete it.
3. Next pick the Ellipsis next to Starting base and delete that as well.
Your Screen should look like this.

4. Next select Ambience in the Scene Graph, This is the Environment.
5. Scroll down until you see HDRI environment.
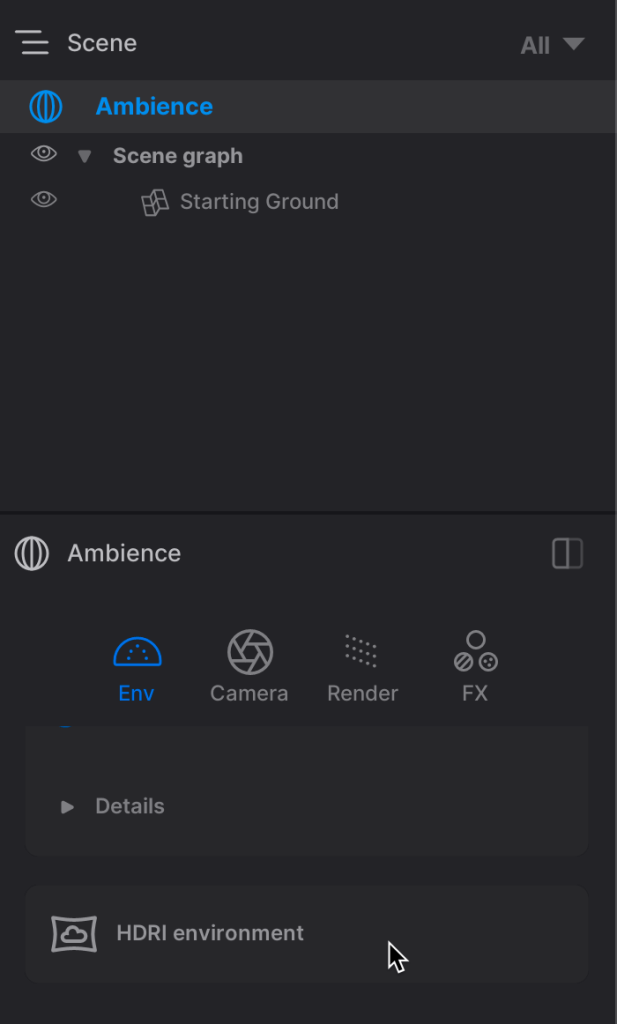
6. Select HDRI environment
7. Check off Enabled, select Backdrop HDRI, Scroll down and select the Ellipsis on the Approaching Storm image (or whatever image is there)
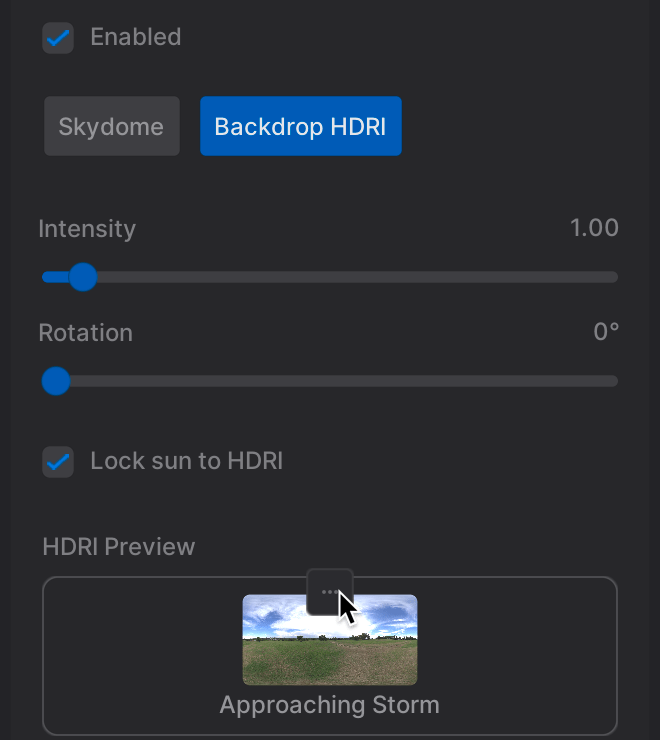
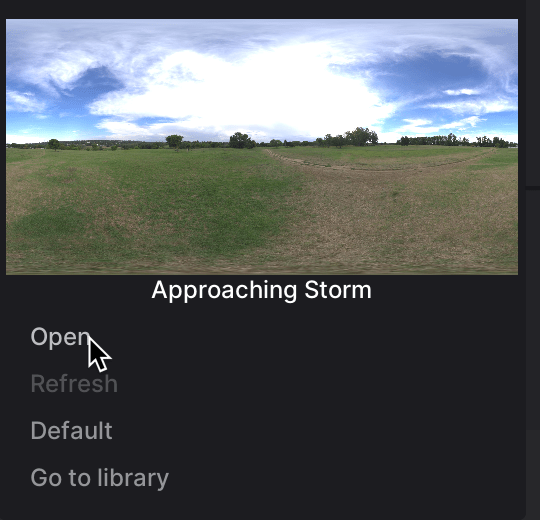
8. This will open your explorer or finder and find and select the HDR we just made. It might take a minute or two depending on the size of the file or the speed of your system.
You should now see the new HDRI
It will look strange at first, that’s normal
9. Scroll back up to the scene graph and turn off the starting ground, we’ll need it later but it will get in the way for the next step

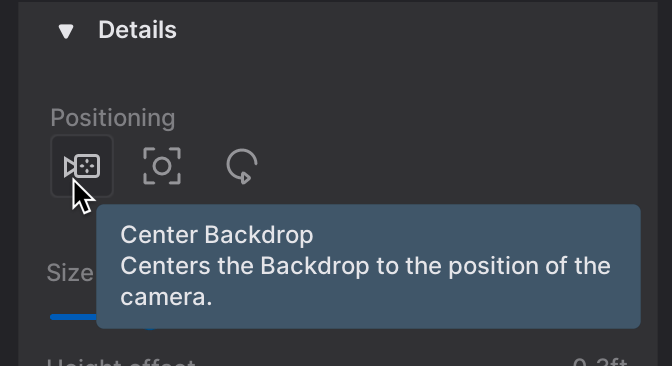
10. Scroll back down and Select the Twirl down arrow next to details
11. The First Thing I do is select Center Backdrop and If you are LUCKY then you don’t have to mess with the controls you see, BUT it’s only happened to me once so far. Not to worry. BEFORE HITTING ANY BUTTONS do step 11 FIRST.
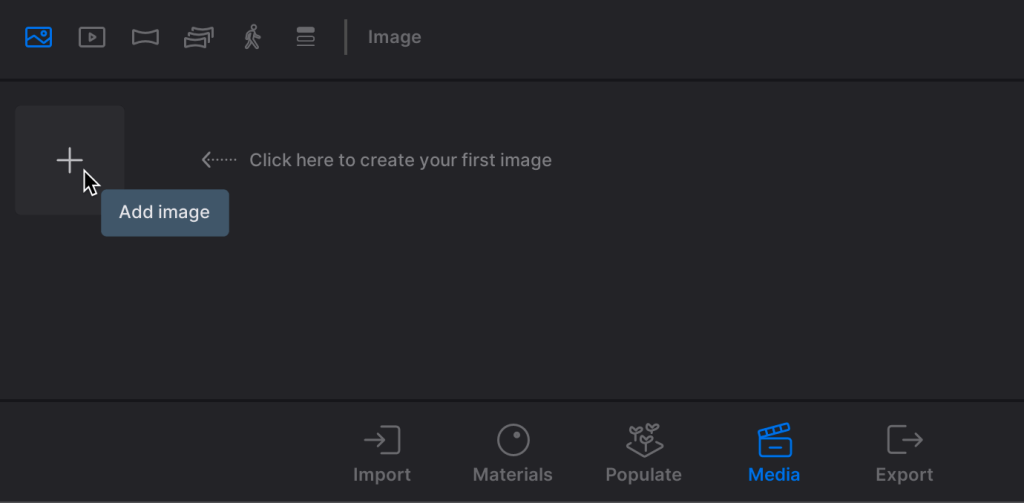
12. Go to the Media dock at the bottom of your screen, Select Media and then select the plus to Add and Image. This gives you a snap shot to come back to when your screen gets messed up and it most likely will at some point. I do this because you will eventually select your screen with your left mouse button, if you haven’t do so already, and this will mess up your HDRI image. To pan around in the scene use your RIGHT mouse button and DON’T scroll with your mouse wheel. Sometimes it can’t be avoided and you have to zoom up to something and I scroll in and just reset my view afterwards. You can also access the AWSD Keys in conjunction with the right mouse button.
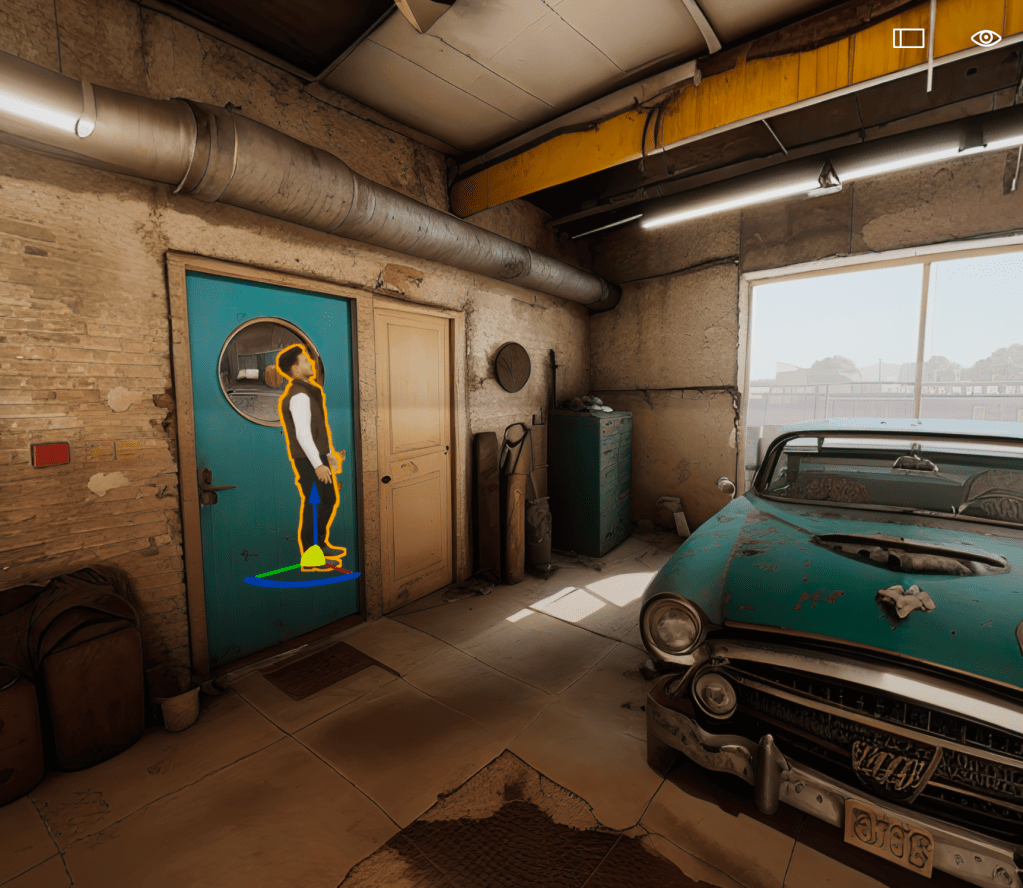
13. Next I check the scale of my scene at this point. If you have a project that doesn’t require scale and you just want to eyeball it that’s okay BUT Twinmotion is primarily used for Architectural Rendering so things work better if you have the scale set up properly. The first thing I do in this Process is go to the Library on the Left side of your screen and select Character, then Animated character and I usually just grab Amir because he’s the first person. Click and hold with the left mouse button to select a character and drag into scene, you can position the character anywhere
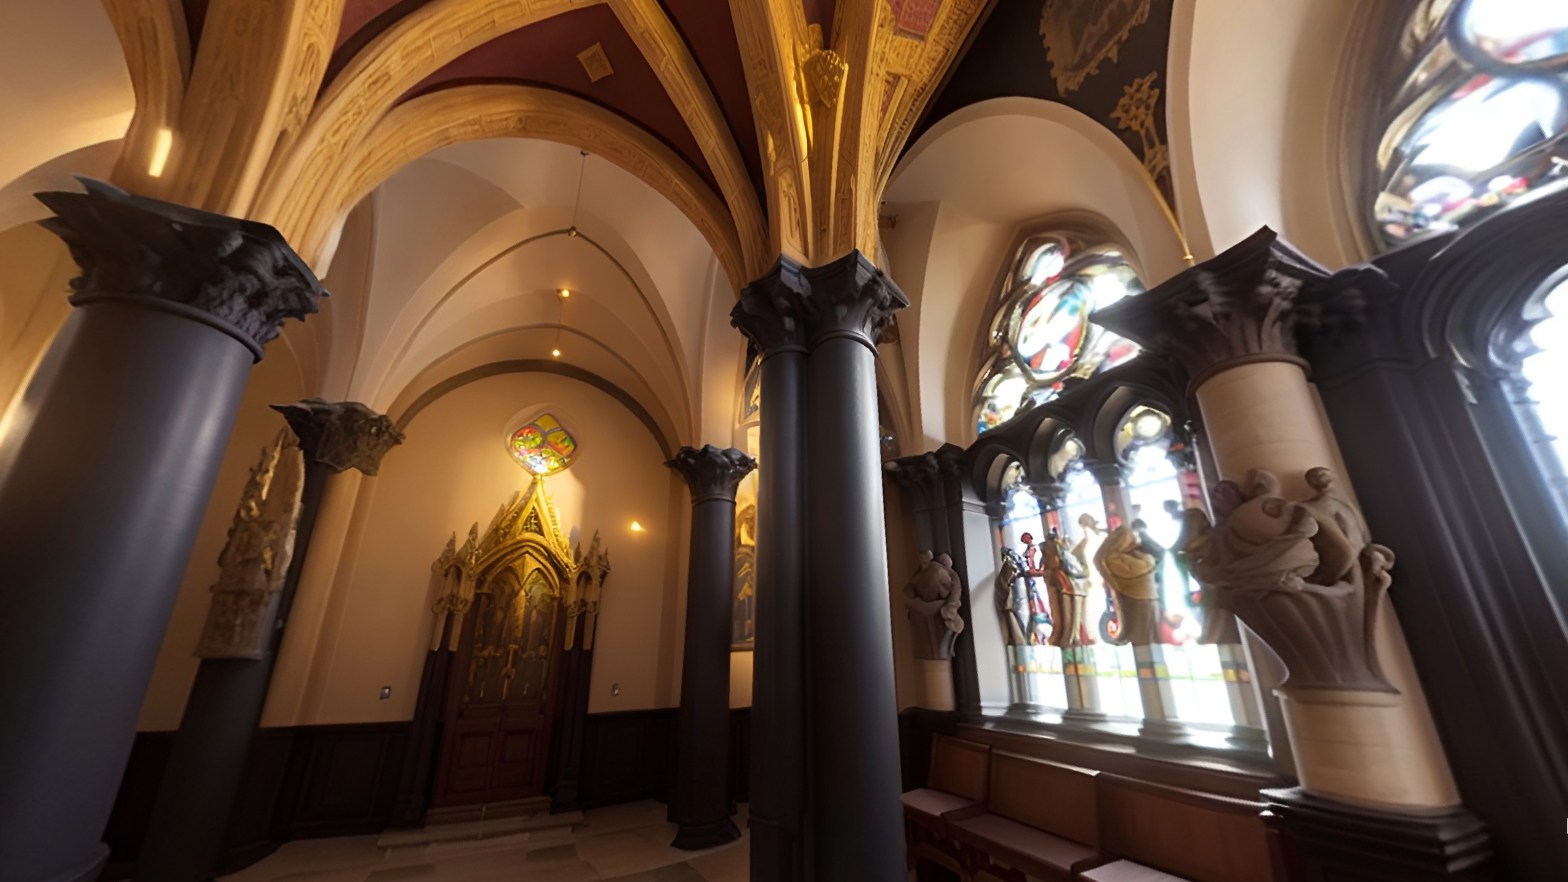
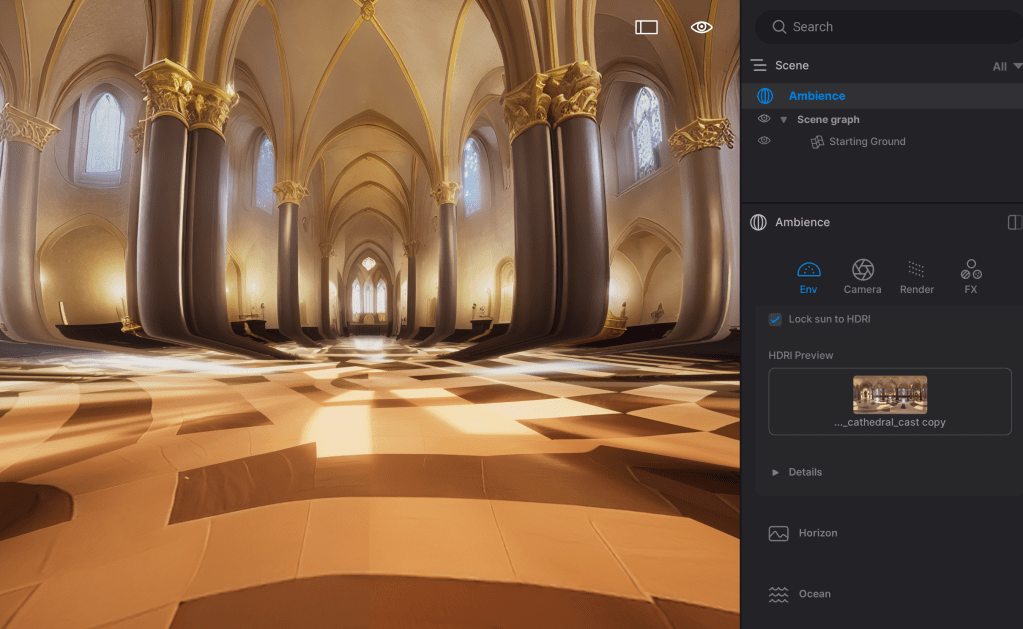
As you can see I changed my scene for this example because the Cathedral was a little bit more complicated. The reason I did this is because it’s good to have something that you know the dimensions of, like a door. The Cathedral had doors but way off in the distance, anyway this works better as an example.
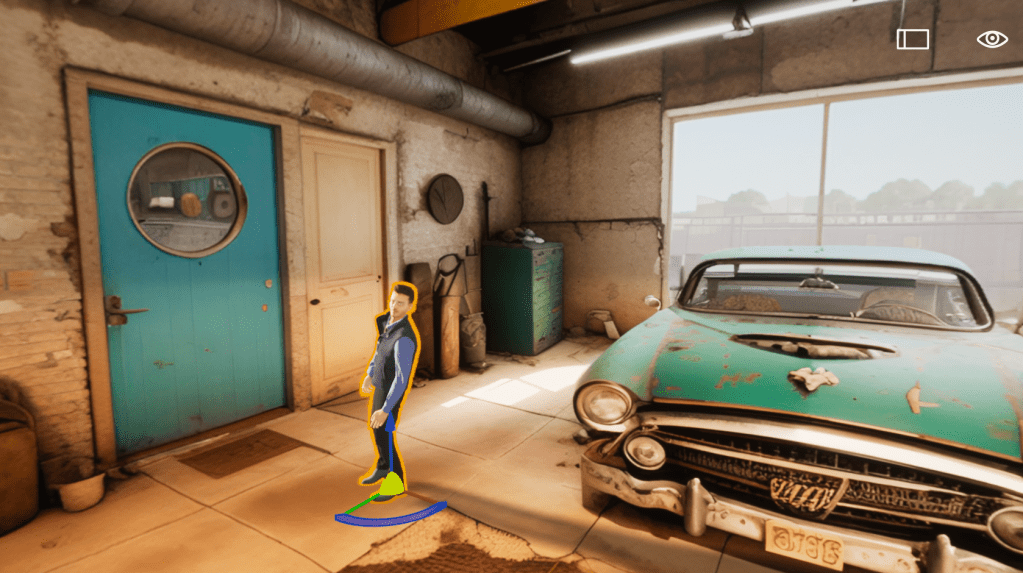
Notice how small he looks. Okay so let’s move him next to the door to see how small he really is. The easiest way to do this is to grab either the orange hi-lighted area or the yellow ball.

If you are familiar with 3D product you already know how to use gizmos but, the blue arrow moves the character in the Z direction or up and down. The Red line when selected moves the character left to right or X, and the Green line when selected moves the character back and forth or in the Y direction. The Orange area between the Red and Green lines constrains the movement to X and Y only. The Yellow ball is special because it always “re-Grounds” your character to the ground or to other 3D objects, it’s awesome for placing objects.
OKAY, Sorry for the long explanations but I think its necessary
So our Character is only about three feet tall (0.91 m), BECAUSE most doors are 6 feet 8 inches tall or about 2 Meters. Some doors are 7 feet or more but that is usually in Commercial buildings. Now we need to adjust all those settings I said you might not have to mess with, but it’s no biggie.
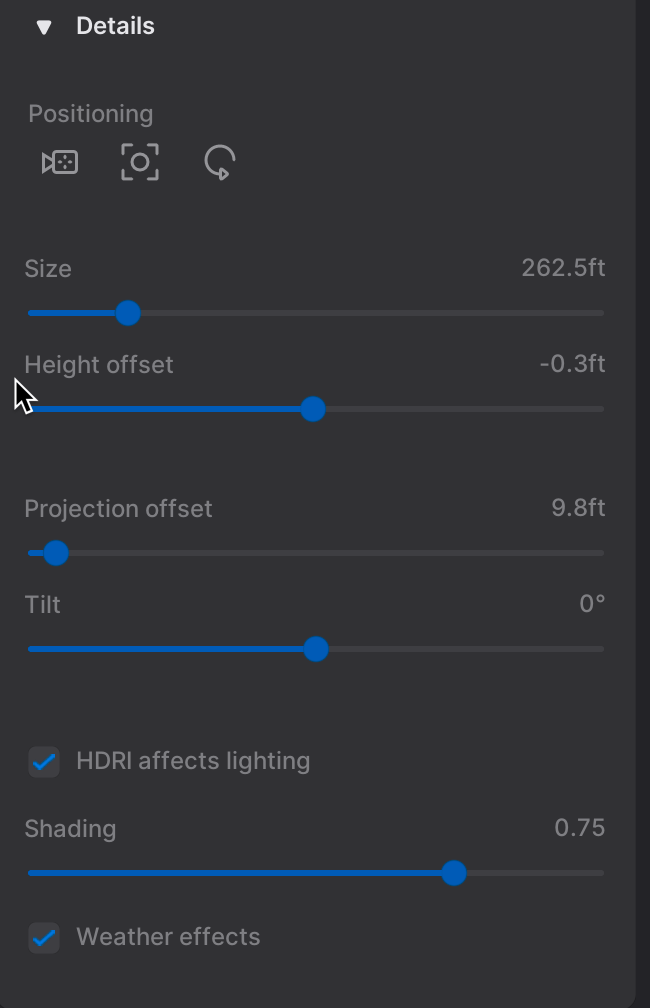
Basically you have to mess around with the numbers for the size of the Sphere (Your HDRI image) and the heights of the maps. I messed around for quite awhile and found a setting that seems to work well in a lot of instances, so I set my initial values to the following. **
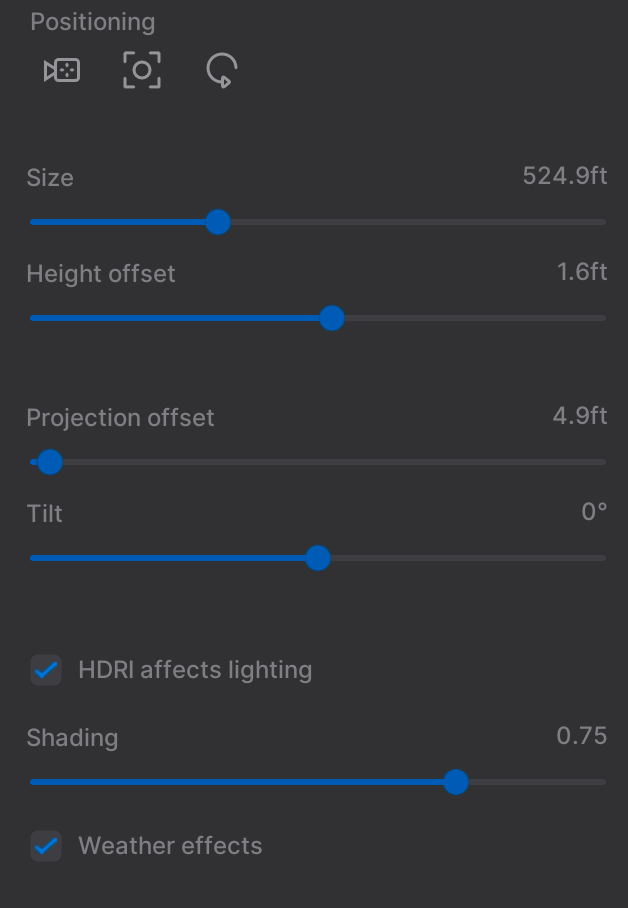
14. Height: 524.9’ Sets the diameter of the Backdrop’s hemisphere dome on which HDRIs are projected, Try these setting first, I start with 524.9’, unless it’s a cathedral or something larger, for small spaces it’s good.
Height Offset: 1.6’ Determines the height offset of the Backdrop relative to its default position. I think this should be close to zero and 1.6′ seems to work well
Projection Offset: 4.9’ Determines the vertical UV projection of the HDRI on the hemisphere dome of the Backdrop.
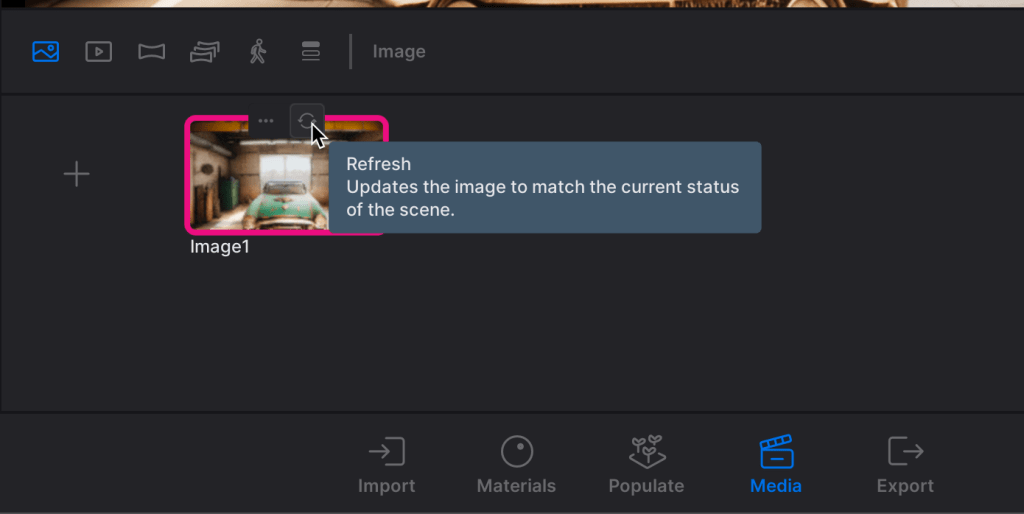
ONCE you set these values go to the Media Dock at the bottom of your screen and REFRESH the image. The image will hold all of the environment settings that were set at the time it was created
This is important to do because if you need to go back to that view and select the image all of these settings will go back to what they were before.
**Initially when I set my values I was in the Default of Metric system and the defaults are 80 for size -.1 for height offset and 3 for Projection offset. I set my values to 160, 0.5, and 1.5 respectively. When I changed my units to Imperial the values changed accordingly, that’s why the values are so strange.
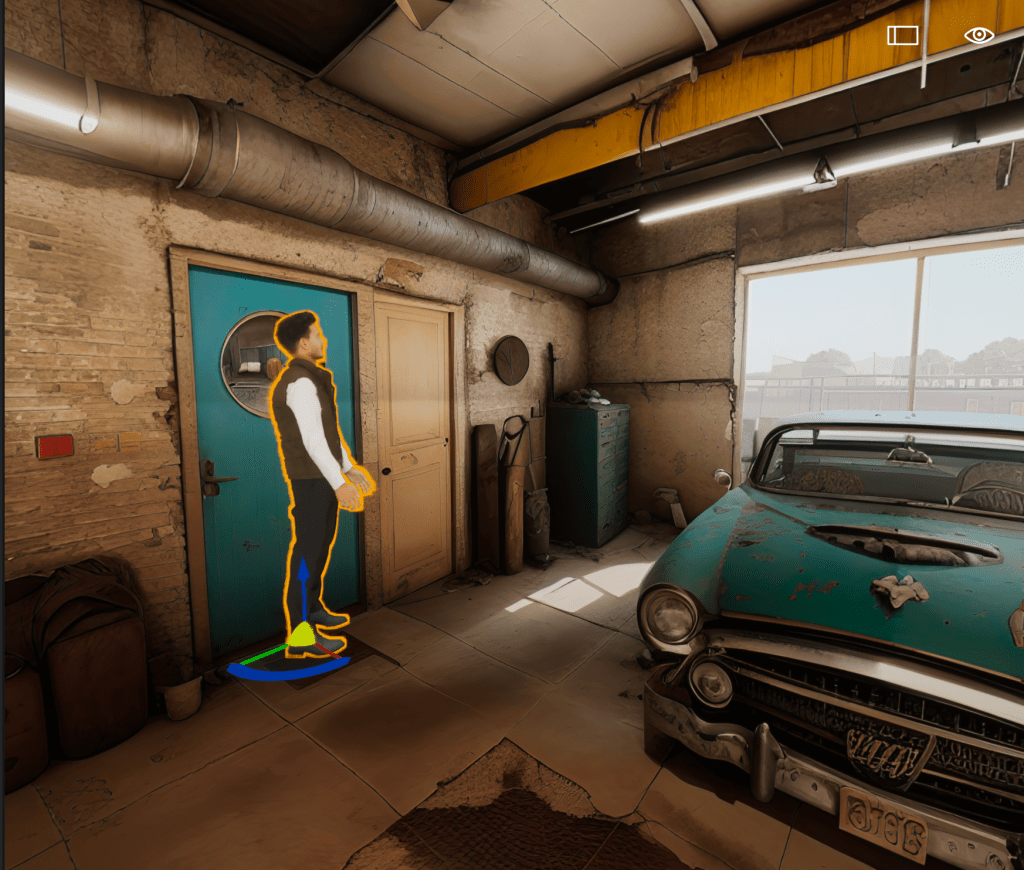
15. You will notice that the character looks small still. Click on the Yellow ball and drag him back into the scene and he should now look larger and more appropriate.
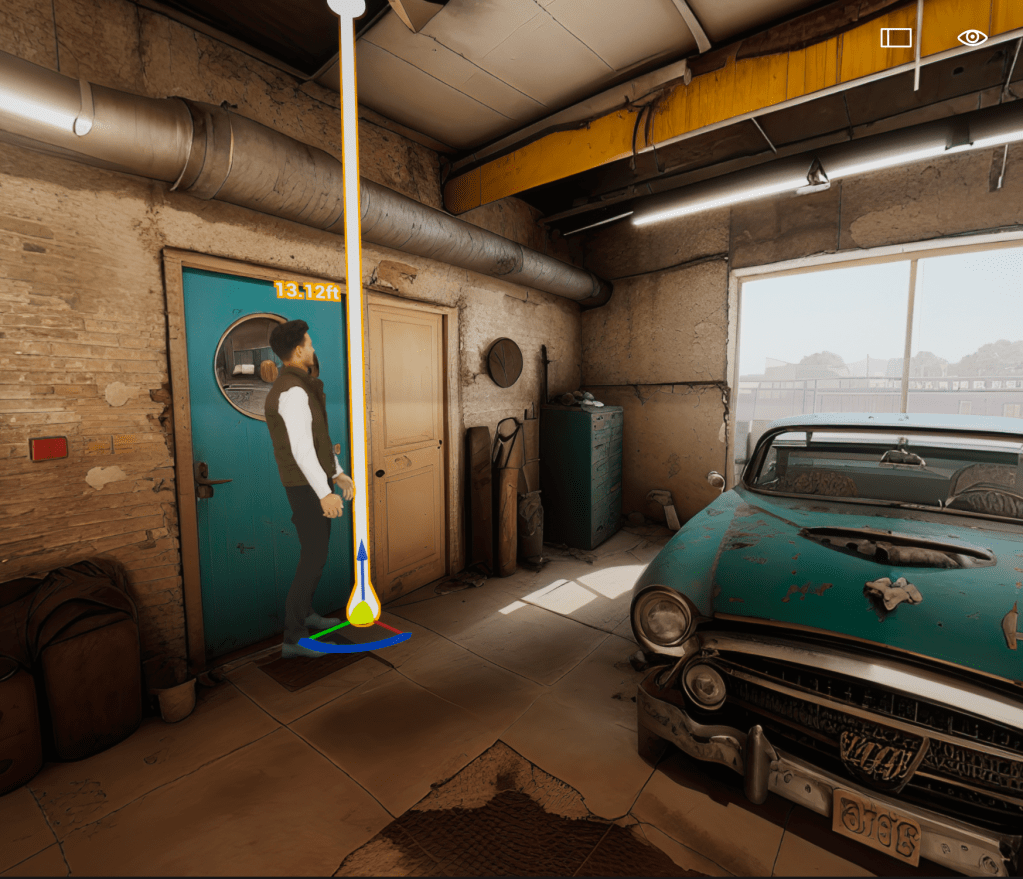
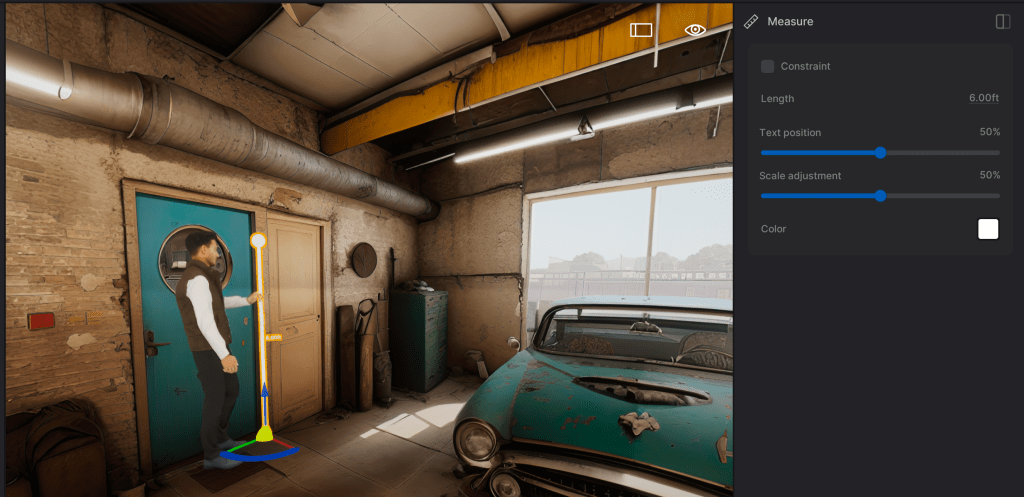
16. This should be the last step. Go to your Library on the Left side of your screen and select Tools, Then find the Measure tool and drag it into your scene, place it next to your character. The Default measurement is 4 Meters or 13.12 feet. Go to the properties on the right, uncheck Constraint and set the value to 6’ the rough height of our character. If things look off then you will have to adjust your values, just know that very small tweaks can make big changes.
The rest is now up to you. You should now be able to drag more models into your scene at the appropriate scales. But, sometimes you will get really large or small models, especially from the SketchFab Library, and this is caused usually because of the units of measurements. Metric conversions are easy as long as you know the conversions
2.54 cm = 12in or .304 m = 1 ft //// 1 cm = .394 in or 1 m = 3.28 ft
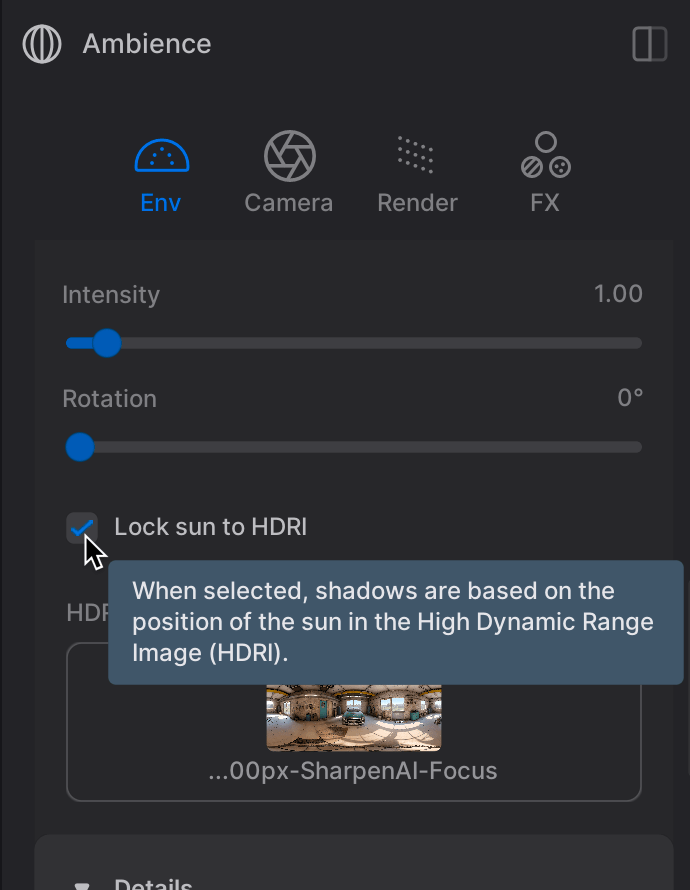
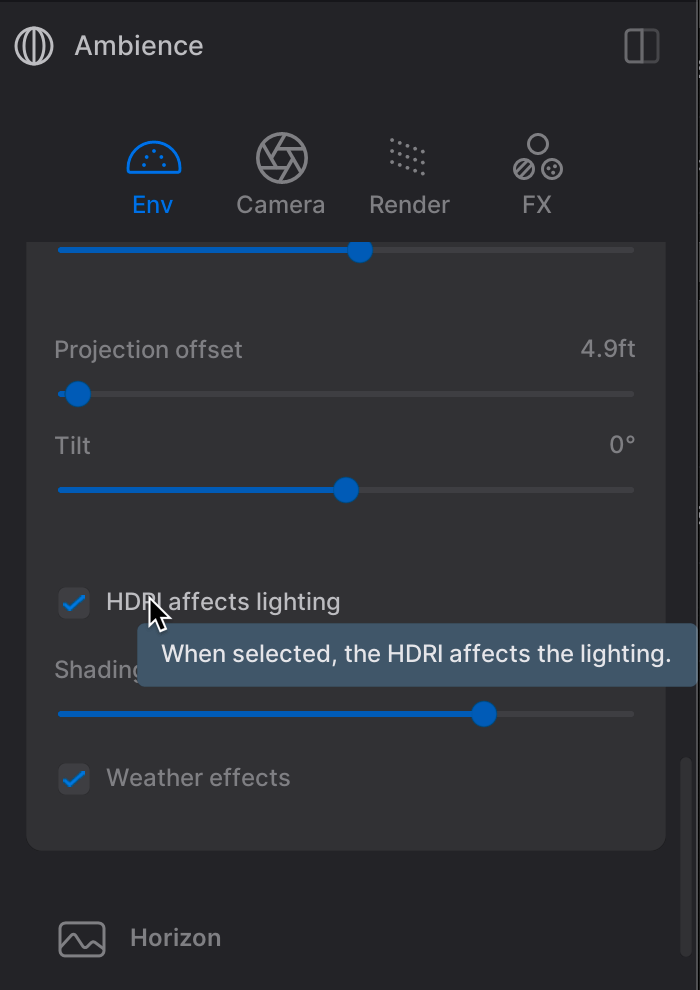
I didn’t discuss lighting but you see the shadows of your 3D objects within the scene. You can rotate your skybox in the HDRI settings and this will rotate the HDRI sun. If you want to use the dynamic sky lighting then you can turn off the Lock sun to HDRI. There is another setting that can also affect the lighting with the dynamic sky called HDRI affects lighting. Hovering will also give a little help.
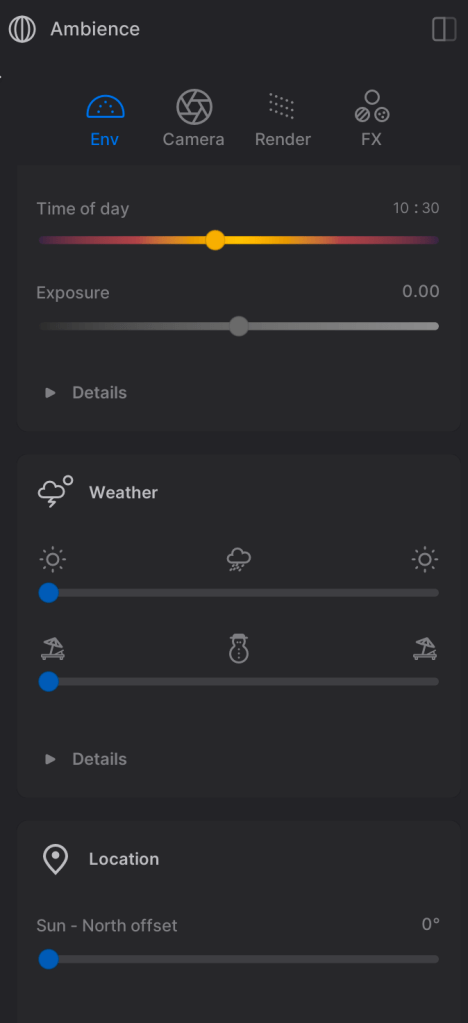
Once you have the dynamic sky set you can control the Time of day, Weather, and Location. You can also try the adjustments with HDRI on but if you have a bright daytime HDRI it cannot be changed into a night scene, although it can dim and brighten, the backdrop image will not change.
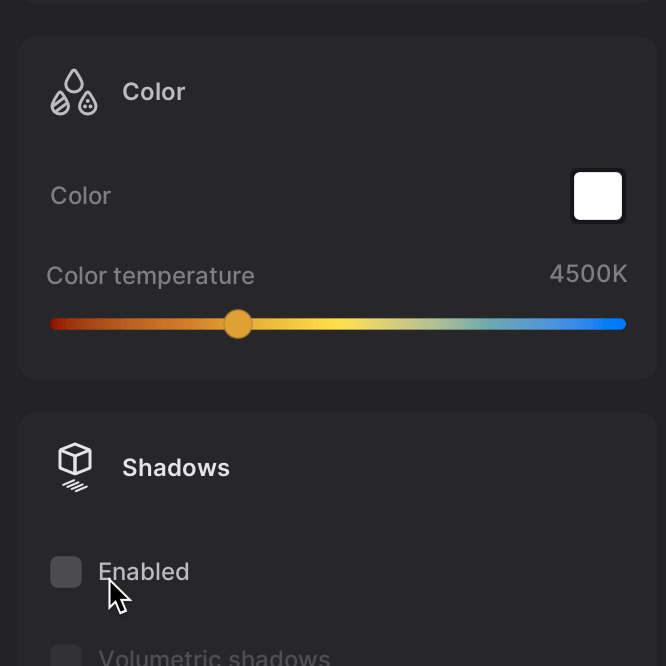
Of course you can also add lights but just know that the shadows are turned off by default so go to properties if you want them turned on.
HAVE FUN !! And GOOD LUCK!! and If you like this Tutorial I’l be posting more in the Future. You can also stop by my YouTube Channel where you can find some 360 VR videos, Tutorials, My Music and More. Just click my Logo and you will go to Youtube
